
|
Specifications:
- Wingspan: 36 in.
- Wing Area: 192 sq. in.
- Flying Weight: 17.5 oz.
- Wing Loading: 19 oz / sq. ft.
- Airfoil: Eppler 182, straight taper planform
- Motor: Graupner Speed 400, 76V
- Prop: APC Electric 5.5X4.5
- Cells: 8x800AR
- ESC: Viper 51
- Radio: Hitech Flash 5X, Hitec micro 555 receiver, 2 FMA S80 servos.
- Manufacture: Garrison Aerodrome, http://www.rc-aero.com
- Price: $54.95
|
Introduction
The Manx which is the flying wing version while the Hot Cat
has traditional tail feathers. Both are primarily EPP Construction. But the similarity
with other EPP aircraft seems to end there. These look to be very high performance
models. They have the thinnest most efficient looking airfoils I have ever seen in
EPP.
Darwin Garrison has not rushed to market with these kits, they are very well thought
out designs and kits.
I constructed the Manx while traveling, hence the plush covered building surface.
The Manx is a very complete and extraordinarily well thought out EPP design.
Kit Contents:
EPP Pieces - wing core, Fuse, extra block for repair etc., Wood
Pieces spar, wing trailing edges, Elevons, & Motor Mount, Corroplast - Rudder,
Hatch, & a extra piece for repair or what ever, Hardware - everything you need
to connect the Elevons, and the clever hatch rod.
 Pretty
Much the whole kit |
 Getting
an early look at my Manx Simple ! |
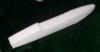 Fuse
showing wing saddle and pre-cut tail slot. Darwin has done 99% of all the EPP foam
cutting. |
 Side&
Bottom of fuse showing the pre cut equipment cavity & wing saddle. |
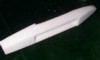
 Front
& bottom showing precut motor cavity & Equipment Cavity. |
Needed to complete:
All the adhesives - 3M77, 5 Minute epoxy, Polyurethane Glue, Contact Cement,
Tapes - Mainly Filament Tapes and hinge tape, Covering material, Motor, prop,
battery, esc, rx, two micro servos.
Construction:
Darwin has out done himself. He has some really neat design ideas built into
these nice kits which are also nicely priced besides.
This plane builds up fast, especially if you have some experience with EPP foam models.
As with all EPP models, construction consists of bonding in any spars or stiffeners,
spraying the EPP with 3M77 adhesive and then placing layers of filament tape and final
coverings. The 3M77 is absolutely the adhesive of choice for this operation.
Nothing else seems to work as well.
Some words of warning; follow his instructions, use the recommended adhesives Darwin
has debugged it pretty darn good. The changes I tried to make resulted in taking it
back apart and doing it his way. I could have been flying a week earlier if I
would have been smart enough to follow his directions. Darwin has some techniques
that were a little different that what I had used in the past. On this model
Darwin's methods are better.
For sure follow all his directions about keeping the wing flat. Lacking a
good hobby building surface I found it chore to keep the wing from having some droop.
Darwin gives the choice of covering with the Zagi type tape or the Oracover
Film. I would definitely recommend the Oracover. If I had used the tape or
something else I do not think I could have ever gotten the wing flat.
 Completed Wing Core &
Elevon Stock |
 All shown setting on the fuse |
 Completed Wing with the
Elevons |
 All shown setting on the fuse |
One change that I did make was to install a sub-Firewall.
Same as the one supplied, but with a large hole bored in the center to allow the motor to
pass through and then I screwed the actual Firewall / Motor mount to the Sub Firewall.
Firewall Modification
I was particularly glad I did this as the first speed 400 motor I used just would not
rev up well, so I had to change the motor right away. Being able to just pull it out
the front made it some what easier. I also want to be able to pull the motor out,
and put a Rx pack up front and try it slope soaring. Looks to me to be ideal for
that also.
The only EPP carving left to the builder is to cut out the two cavities for the servos
& to carve out a passage from the rear of the motor cavity to the front of the
equipment cavity. I did less carving out on the passage by making the motor
removable from the front, however, Darwin recommends opening up the passage all the way
for cooling
I used Titebond II wood glue throughout construction and recommend that you use
something similar, especially on the wing. Pica recommends their brand of aliphatic glue,
PICA GLUIT. I wasn’t able to find any until the building was almost complete.
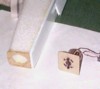
Servo Installation & Access Hatch
Clean mounting of the servos, needs minimal carving and they are also easily removed
even after the wing is permanently glued on.
Darwin's really clever hatch design. Consists of a piece of nylon push rod
housing which slides through the corroplast from the firewall through the hatch cover to
the end of the corroplast. Don't feel bad if you can not visualize this, I did not
understand it until I opened the kit. It works great.
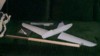
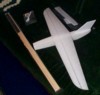
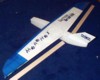
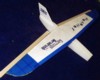
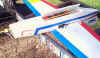
Finished Manx.
Mine came out just a tad over 17oz, I did not have a 5.5X4.5 prop available so I used
the trusty Gunther (Zagi Prop). On the other hand I still have some of the old
500ar's and used them for my flight pack. I am pretty sure the extra omph of the
500's made up for the lighter prop.
Flying:
After waiting 4 days for a quiet evening, I gave up and went over to the school yard,
15-20 mph winds and all. Gave it my firmest launch, it started up and over to the
right, I tried to correct - this was promptly followed by some spectacular low level
aerobatics ending with a really rough nose in full power. Absolutely no
damage, but good I had a second Gunther Prop with me! The control throws were too
sensitive me and my skills.
I dialed in 100% exponential, 15-20 mph winds and all. Gave it my firmest launch,
it start up and over to the right, with the exponential on the controls I was able to
recover, not pretty but recovered. Did several race track turns around the
field. "This Cat really has Claws" It penetrated the wind with
authority and did some really spectacular down wind runs. Set up for a landing and
had not prepared myself for how much this cat would speed up once it dropped close to the
ground out of the wind. Did one of those disheartening end over end cart wheels when
I dropped a tip, you know the type of landing that would totally re-kit a traditional
model. Again no damage, "This is one tough Cat as well".
To get ready for flight 3, I returned home to charge the batteries and adjust the
throws on my Manx. I cut them about in half being I knew where the trimmed out
settings were. Then back to the school yard winds still blowing. Much
better, I was not over controlling and the Manx was tracking like it was on rails.
Even pulled off a smooth landing.
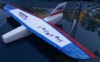
The finished picture above are of the finished cat and after 2 nasty
crashes. If you want a hot plane to enhance your skills or for combat, this is
probably just the Cat for you. It will travel very well and ward off any form of
hanger rash.
Recommendations:
So if you want some tough fun, the Manx or the Hot Cat might be just the thing, I
recommend it.

October 1, addendum - Flew the Manx again
today, the winds were light. This bird tracks and behaves nice. No negative
aspects even with my throws back up where they were in the beginning. This is
the fastest aircraft in my fleet. It also slows down fairly well, but not a
floater. Its appearance is also outstanding both in the air and on the ground.
Especially if you consider its an EPP model. Gets lots of attention and positive
remarks.
It will take a few more flights before I am ready for combat with it. But right
now I could make blistering passes through the Zagi pack and hope for a lucky hit.
At least I know I will still be flying coming out the other side.
E-mail Contact ijcooper@juno.com
|


